Want to try it for yourself?
Three Steps to Container Image Security
Guide to container security produced with Docker
0 mins read
Container image security with Docker
If you've ever scanned a container image for vulnerabilities, you've likely found more than a few issues — perhaps hundreds, even thousands. This guide Container Security for Development Teams, co-authored by Snyk and Docker, focuses on the container image and the software packaged up inside. You can download the PDF version of this guide to container security here.
It begins with a look at why container security is important. Containers are increasingly more popular, but present security risks that can potentially expose businesses to lost productivity, reduced sales, and even millions of dollars in fines. This article outlines our three-step process to create secure container images. Sign up for a free Snyk account to easily find and fix vulnerabilities in Docker images and open-source libraries. You should also check out our full guide to container security.
Three steps for container image security
As we noted earlier, container image security is not a single area of concern - it spans developers, security, and operations teams. There are multiple security concerns that apply to containers
The container image itself and the software inside
The interaction between a container, the host operating system, and other containers on the same host
The host operating system itself
Container networking and storage concerns
Security at runtime, often in Kubernetes clusters
Each of these bullets deserves a guide of its own to do it justice, and all but the first bullet already have one or more guides available. This guide focuses on the container image and the software packaged up inside.
At a high level there are three key steps to creating a secure container image:
We will consider each of these in a bit more detail to see how this approach can create secure container images.
1. Secure your code and its dependencies
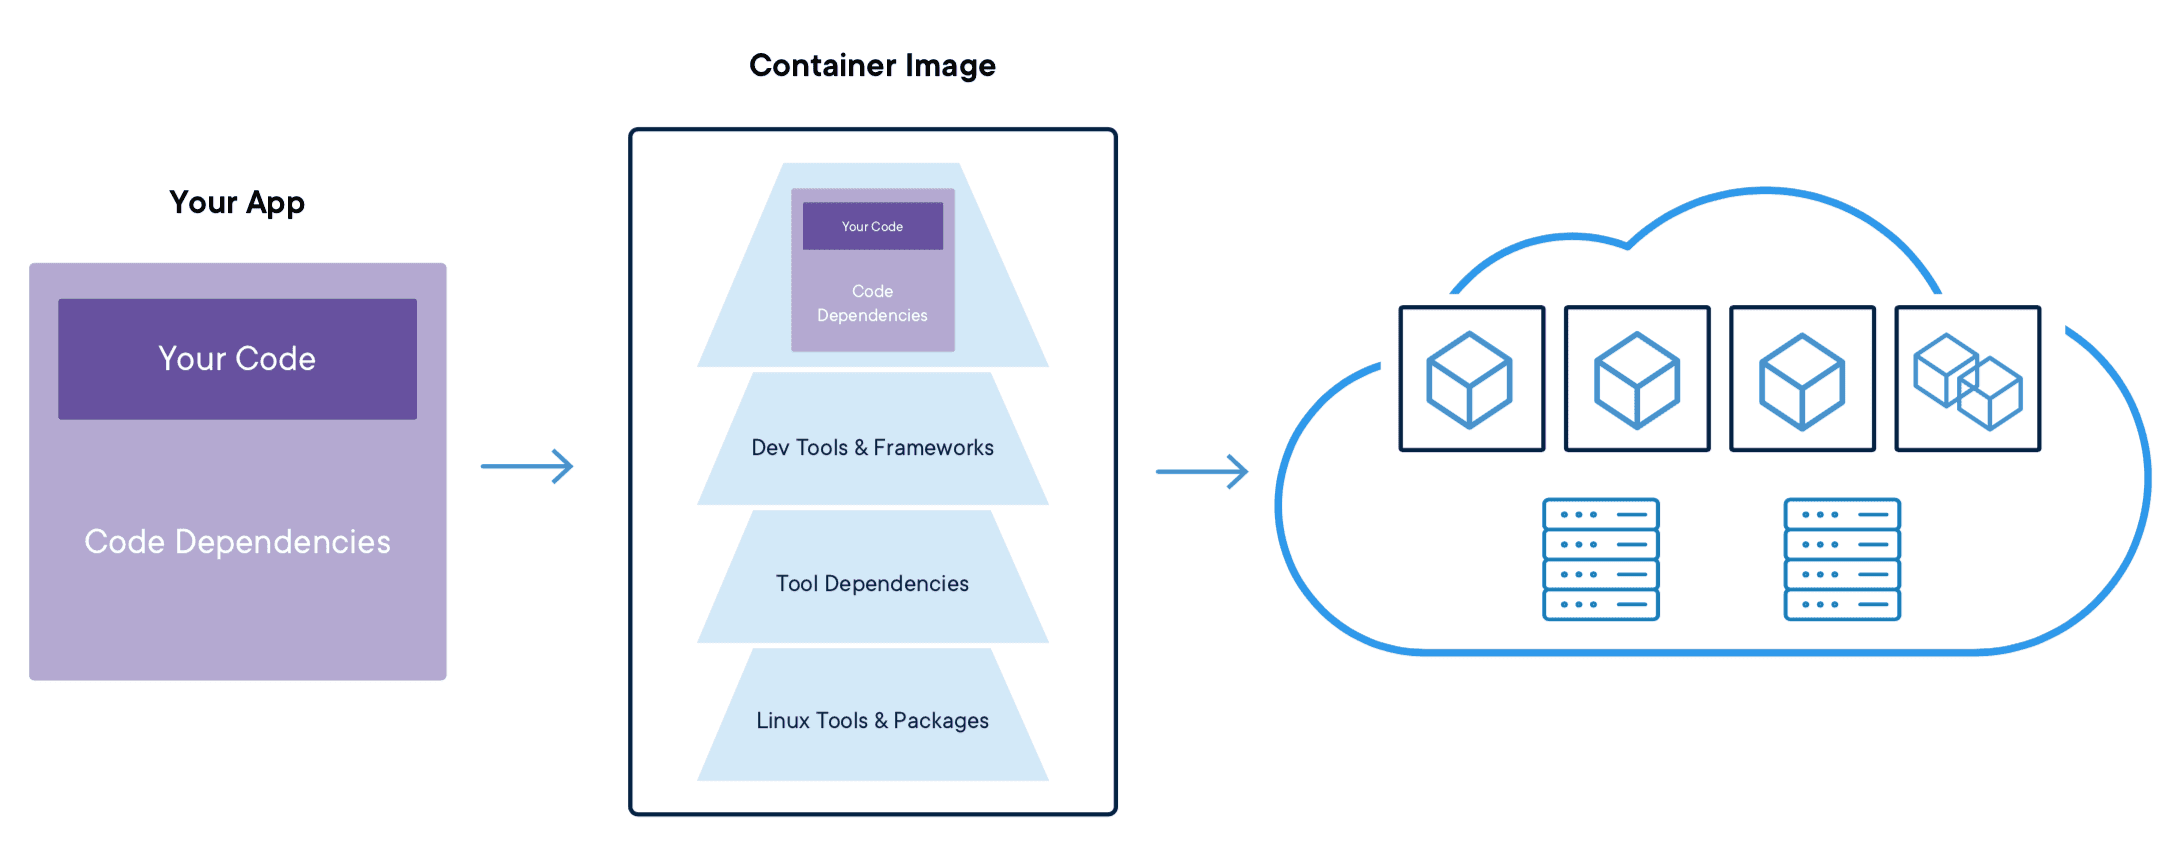
Delivering your cloud native applications faster is likely one of the key reasons you're creating a container in the first place, and your applications are the lifeblood of your organization. In the not-too-distant past, application security began and ended with the code and, while containers and other modern development practices have expanded the broad meaning of "application code," this particular area of concern still remains.
Fortunately, this is the portion of container images that's most directly controllable by developers and, hopefully, the best understood. Nonetheless, tracking down all your code dependencies and figuring out how to fix security issues isn't trivial. Assuming that you have access to the source code itself, you should use purpose-built tools – like Snyk Open Source – to perform software composition analysis (SCA) and static application security testing (SAST) to analyze your code and its dependencies. In modern applications, it's not unusual for the 3rd-party open source dependencies to make up the majority of the lines of code in an application.
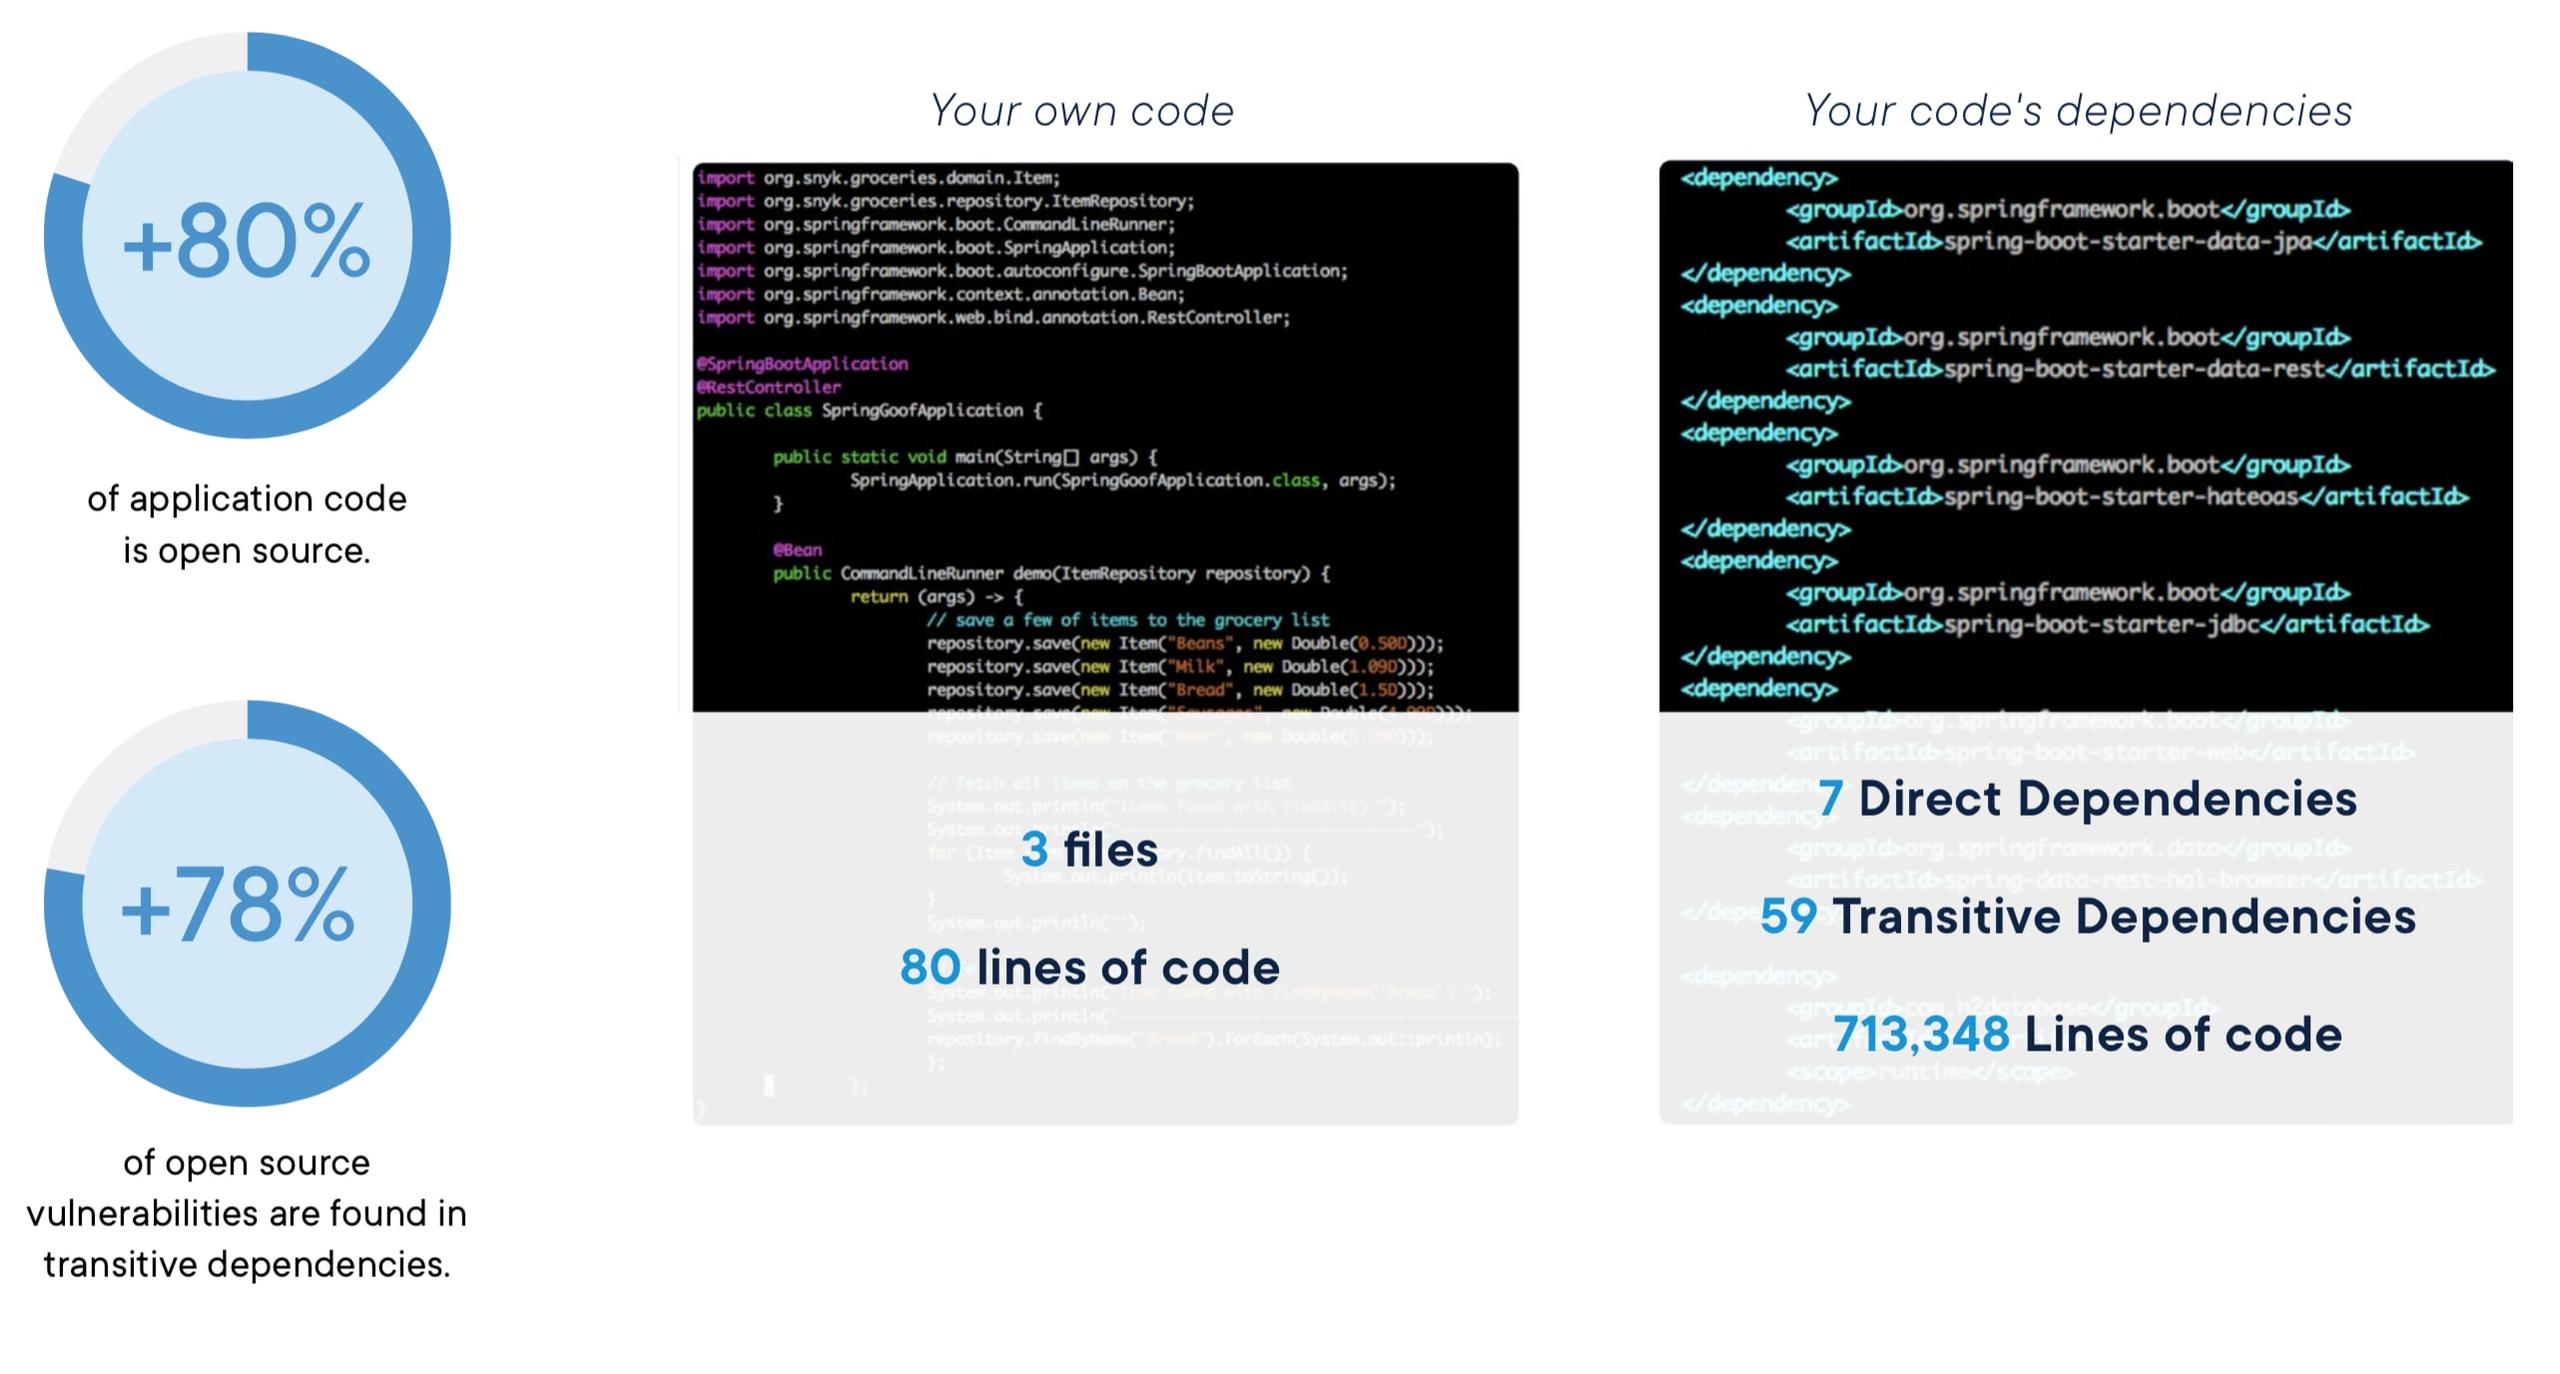
Figure 2: The amount of open source code in an app can easily dwarf the amount of proprietary code.
Spotting issues early in development and integrating security tools with your source code opens up the possibility to automate this process, independent of the containerization phase. It is possible to scan a container and analyze some types of code, however, catching these issues directly in your Git commits, pipelines, and repositories will likely fit a developer's process better.
Get started in capture the flag
Learn how to solve capture the flag challenges by watching our virtual 101 workshop on demand.
2. Start with a minimal base image from a trusted source
What’s the big deal about small images?
The base image – the `FROM` line in your Dockerfile – is one of the most important considerations when it comes to security. Fortunately, many trustworthy vendors provide content you can easily use. Docker Hub is by far the most popular starting point for sourcing container base images.
Docker Hub has more than 3.8 million available images and more than 7 million repositories. Docker Hub is very active and sees about 11 billion pulls per month. Some of these images are Official Images, which are published by Docker as a curated set of Docker open source and "drop-in" solution repositories.
Docker also offers images that are published by Verified Publishers. These high-quality images are published and maintained directly by a commercial entity whom Docker verifies as a Verified Publisher. Docker's guidelines for these verified publishers to follow are a great starting point for defining your own internal container image best practices.

Figure 3: Official images on Docker Hub. Note the “Official” badge and recent updates.
It's easy to go to Docker Hub and find a publicly available image that matches your use case, but you need to pay attention to the provenance of the images you choose. Just like you wouldn't download and install software from an untrusted website, you likely would not want to use images pushed to the Docker Hub by users you don't know and trust.
By using images that are part of Docker's Official program, or if you know and can verify the source and contents of third-party images – perhaps using something like Notary to check digital signatures – then you have some level of assurance of quality. But to further reduce the number of vulnerabilities and add more control to what is packaged inside your containers you should go a step further and choose minimal base images matched to your needs.
As an example, in figure 3, above, there is a Python repository shown, and you can certainly build your Python app and it will almost certainly work. That's because the image tagged on Docker Hub is designed to be easy to work with across many different use cases and it's well maintained. But there are more than 1000 other Python images in this repository.
Should you just use whatever comes in the easy-to-remember `_python` or are there smaller images that would suit your needs and also reduce your security footprint_? The answer, as you might surmise, is that there are almost certainly better choices from a security perspective.
Container image size matters and not just for portability and fast downloads. The image tagged `python` is simple to use because it comes with a fairly large footprint of pre-installed operating system libraries and developer packages. That means it will likely work great with a range of projects and will have everything you might need to compile code and dependencies; but vulnerability scanners might show that they come with a long list of issues to track down, as well.
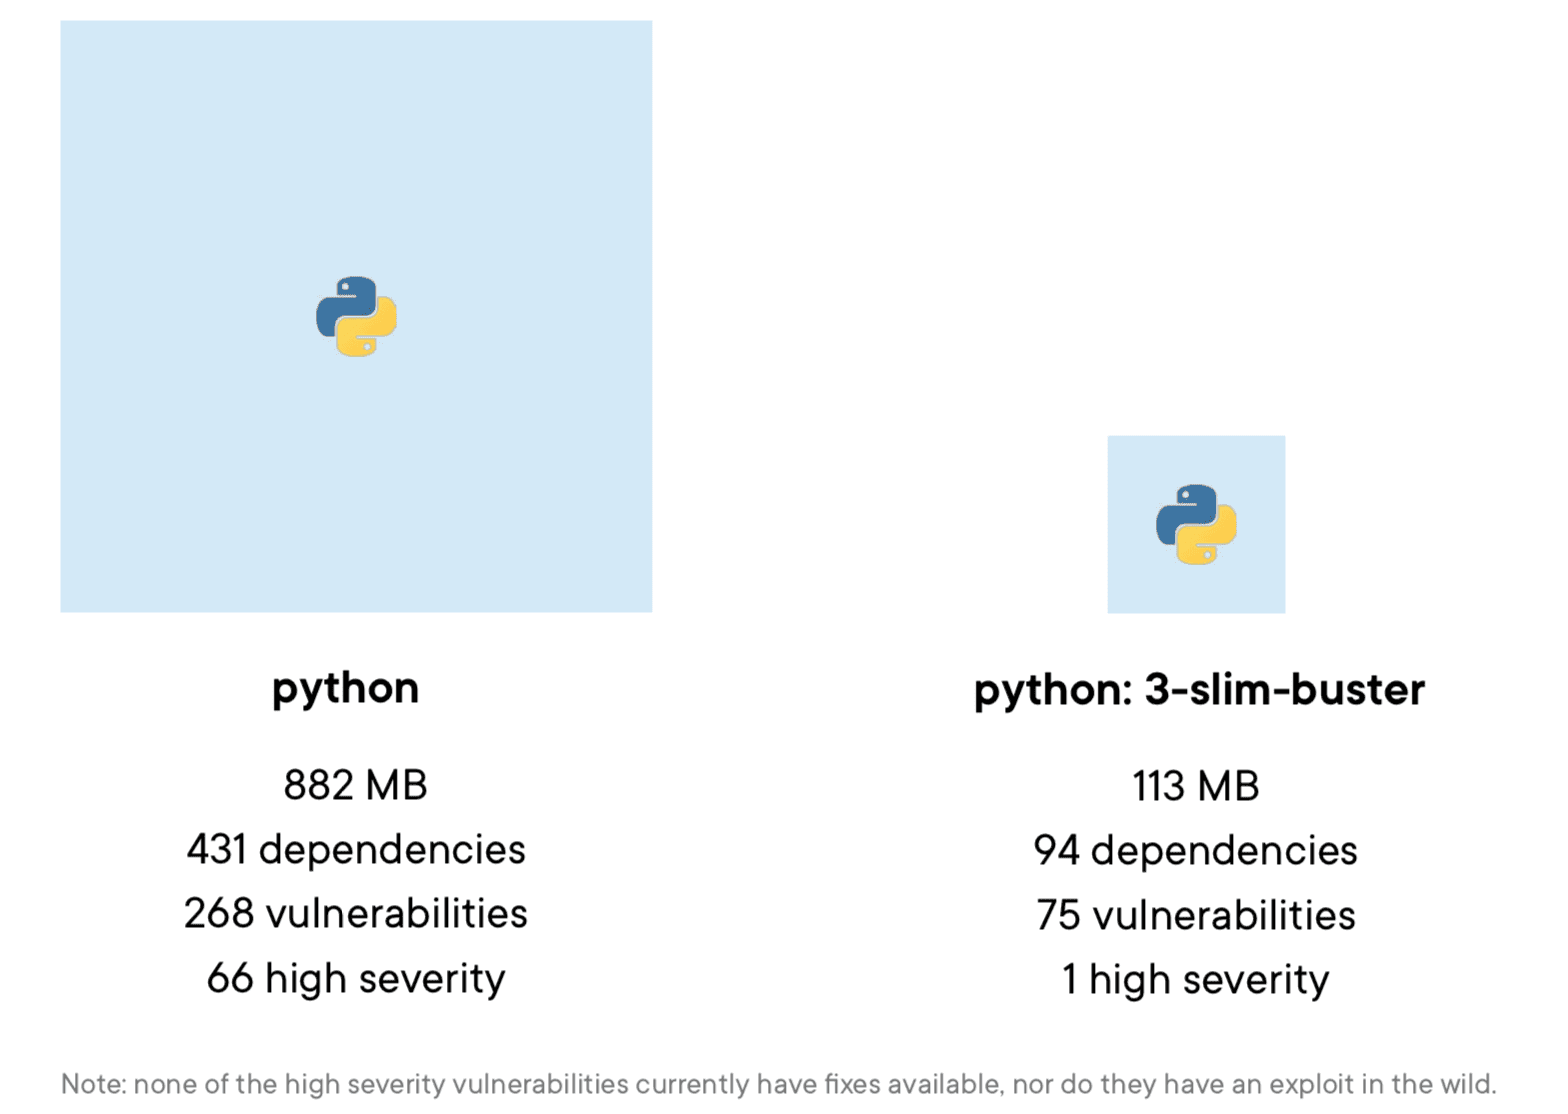
Figure 4: A comparison of two Debian-based images for Python 3.x.
You might wonder about the fact that both images do still have vulnerabilities and in particular, they both have high-severity vulnerabilities. What you find from looking at these particular vulnerabilities, however, is that they are part of the underlying OS packages; none of them have fixes available, and none have known exploits in the wild. In addition, as part of Docker's verified publisher process, both images have been updated with the latest versions of all their packages within the past few days, so they are, in fact, well maintained.
We should also consider some context: often the vulnerabilities that do pop up are in development tools that you would likely want to remove from the production version of your image: tools like `curl`, development libraries, or even from shells and package managers. But over time, the chances of new vulnerability discoveries affecting the larger Python image are much greater than with the slimmer image.
Putting container image security into practice example: base image selection
As we stated earlier, "start with slim images" is advice you can get almost anywhere. But one of the reasons Docker and Snyk have partnered is to enable you to go from advice to action. The integrated vulnerability scanning functionality in Docker Desktop can actually handle some of the work of base image selection for you!
We'll continue with our python example to see how we might go from the Python image to the `python:3-slim-buster` image using Docker vulnerability scanning feature, powered by Snyk. You can follow along with these steps on your own if you choose.
First, we'll start with our simple case and use the python image to build a very simple container image. Here's our Dockerfile to do this:
FROM python
WORKDIR /app
COPY hello.py /app
CMD [“python3”, “hello.py”]
It doesn’t get much simpler than that. The hello.py file is a very simple one-liner with a print (“Hello, World!”)statement.
Next, we’ll build the image and then run a scan on it:
$> docker build -t hello-python .

[+] Building 67.4s (5/5) FINISHED
=> [internal] load build definition from Dockerfile 0.4s => => transferring dockerfile: 36B 0.1s => [internal] load .dockerignore 0.4s => => transferring context: 2B 0.1s => [internal] load metadata for docker.io/library/python:latest 1.6s => FROM [1/1] FROM docker.io/library/python 65.1s
...
=> exporting to image 0.0s => => exporting layers 0.0s => => writing image sha256:3a92e9... 0.0s => => naming to docker.io/library/hello-python 0.0s

$> docker run hello-python
Hello, World!

$> docker scan hello-python -f Dockerfile
/ Analyzing docker dependencies for hello-python/Dockerfile

Organization: snyk-pmm Package manager: deb
 Target file: Project name: Docker image: Base image:
Dockerfile docker-image|hello-python hello-python
python

Tested 431 dependencies for known issues, found 268 issues. Base Image Vulnerabilities Severity
python:latest 268 6 high, 34 medium, 228 low

Recommendations for base image upgrade:
Alternative image types
Vulnerabilities Severity
75 1 high, 10 medium, 64 low
Base Image
python:3-slim-buster
python:3.9-rc-slim-buster 75 1 high, 10 medium, 64 low
First, note in the result the 431 dependencies and 268 issues found in the image. We have cut all the individual vulnerabilities for brevity - we’ll get to those in a bit. We didn’t really add anything interesting to the base pythonimage so all 268 vulnerabilities come from the base, which you can see in the output as well.
But then at the end of the output, we get base image recommendations that can help us improve our security stance. Specifically,the python:3-slim-busterimage shown earlier is listed. In fact, this is exactly how we arrived at our original comparison. We can already see that this new image will remove over 70% of the vulnerabilities we started with from the python image and get us down to one high severity vulnerability, but we will go ahead and build and scan again just to prove this out.
The Dockerfile is a simple change to the FROMline. We’ll save a separate copy called Dockerfile.slim.
FROM python
WORKDIR /app
COPY hello.py /app
CMD [“python3”, “hello.py”]
And then we can build and scan again with a slim tag so we can keep our images separate:
```
$> docker build -t hello-python:slim . -f Dockerfile.slim

[+] Building 21.0s (8/8) FINISHED
=> [internal] load .dockerignore                                        0.1s
=> => transferring context: 2B                                          0.0s
=> [internal] load build definition from Dockerfile.slim                0.1s
=> => transferring dockerfile: 135B                                     0.0s
=> [internal] load metadata for docker.io/library/python:3-slim-buster  11.5s
...
=> exporting to image                                                   0.0s
=> => exporting layers                                                  0.0s
=> => writing image sha256:63768699.                                    0.0s
=> => naming to docker.io/library/hello-python:slim                     0.0s

$> docker run hello-python:slim
Hello, World!

$> docker scan hello-python:slim -f Dockerfile.slim

Package manager:  deb
Target file:      Dockerfile.slim
Project name:     docker-image hello-python
Docker image:     hello-python:slim
Base image:       python:3-slim-buster
Licenses:         enabled

Tested 94 dependencies for known issues, found 75 issues.

According to our scan, you are currently using the most secure version of the selected base image
```
This time you can see there are just 94 dependencies in the full scan results and only one high severity vulnerability. That’s how Docker and Snyk can guide you to better base images. We don’t provide coverage for every image in Docker Hub, as you might imagine, but we do cover most of the popular official base images.
Developer-first container security
Snyk finds and automatically fixes vulnerabilities in container images and Kubernetes workloads.
3. Manage all the layers in between the base image and your code
We went into some depth on the base images because they require special considerations. You inherit whatever comes in the base image as you build up your own layers on top of it, and a slim image often reduces the security burden. But what about all those layers you add to the container? If you start with a slim image, chances are you'll need to add tools and libraries, plus you'll have your code and various things to install to make things work, and all of those need to be monitored for vulnerabilities.
The good news is you directly control these middle layers, which we consider to be everything after the first FROMline and the final Dockerfile lines where you set up your code to run. More specifically, we’re interested in the RUN, COPY and ADDcommands in Dockerfiles as these are the ones that will install things. Technically, your code might be somewhere in these middle layers, too, but philosophically we’re going to call your code the final layer, mainly because we already dealt with the code in Step 1.
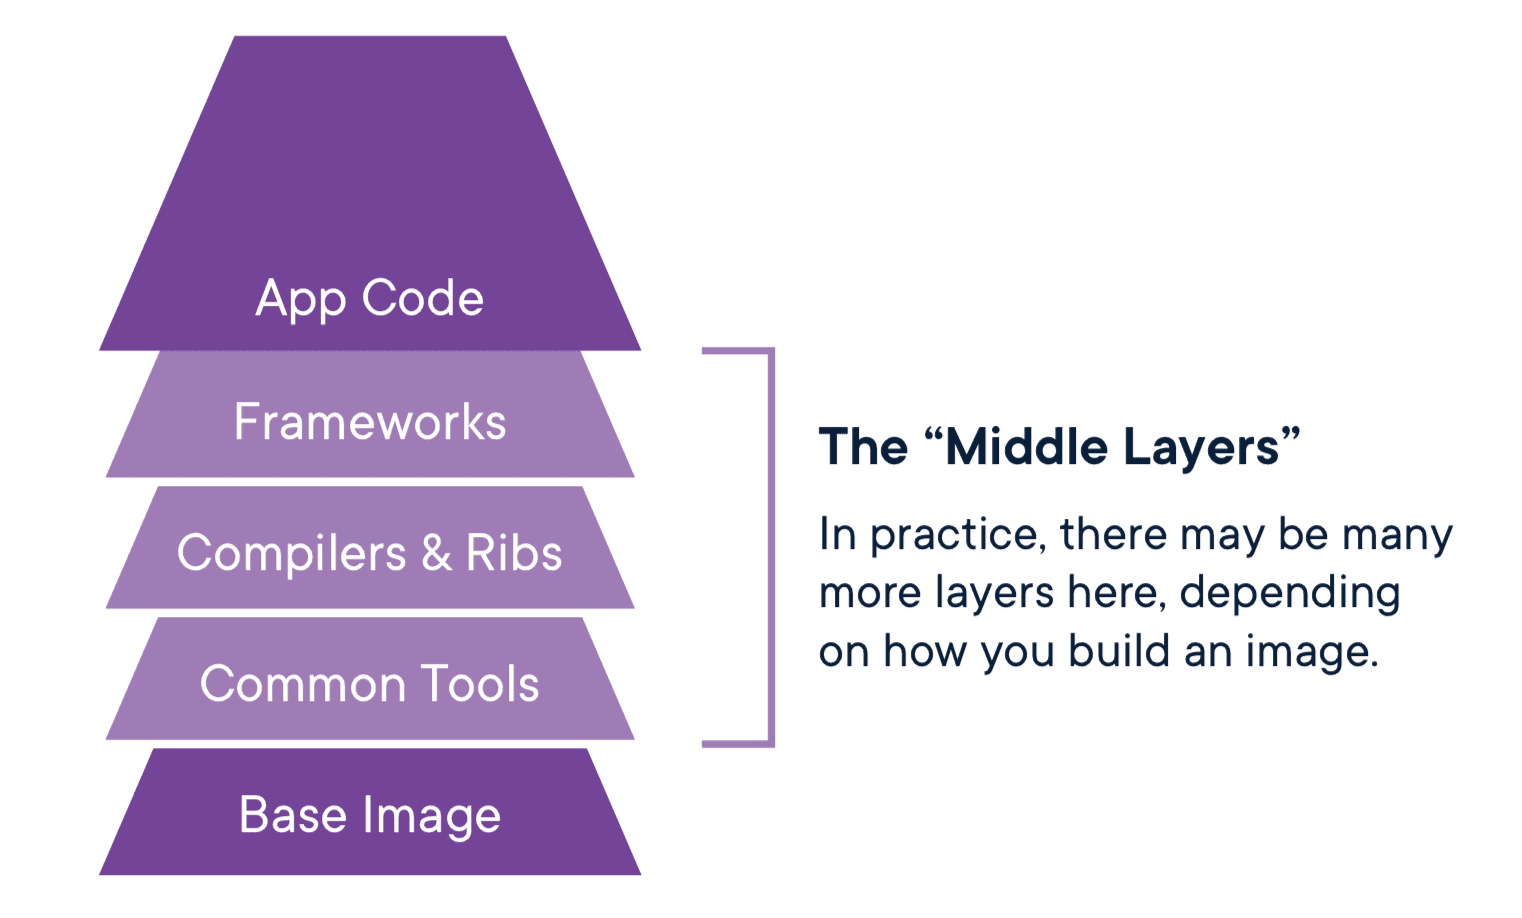
Figure 5: The middle layers of a container image
One of the most difficult things about managing vulnerabilities in these middle layers is prioritizing what to pay attention to in the various stages of the lifecycle.
At each stage you might need different sets of tools, but as images head to production you should remove everything that isn't absolutely necessary to run your application. Customizing your images by starting with a minimal base and then adding your tools makes it very easy to remove these tools later by simply taking them out of the Dockerfile and rebuilding, or even better, by using multi-stage builds to capture all these stages in a single, automated build process.
Prioritizing security vulnerability fixes in containers
With that said, you are still going to find security vulnerabilities and need to determine how to handle them. Getting to zero vulnerabilities is great in theory, but in practice it's likely not feasible or worth the time spent.
Here is a suggested starting point for the traditional working stages of development, testing, and production. Your software production processes are likely to be more complicated, but you can adjust accordingly.
Start with development images
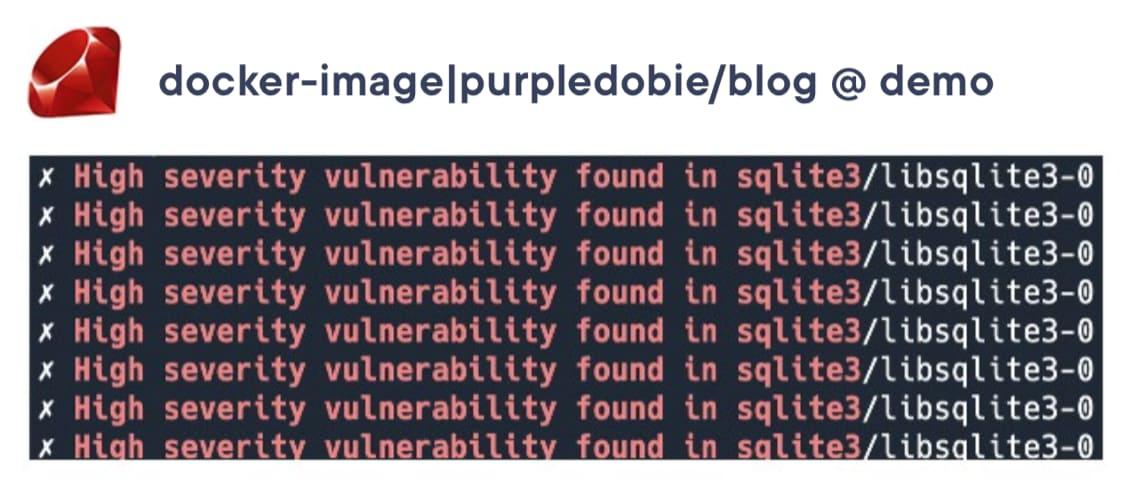
Development images will likely have the most vulnerabilities in the middle layers because they likely need the most tooling and support packages. The good news is that IF you're building images in stages and your production images do not include all these extras, you may be safe ignoring many of the vulnerabilities at this stage. Part of making this decision requires being able to track dependencies installed in the container and match that up with what you know is required for your inner loop development work. It's quite normal to have a vulnerability in a library that gets installed as a dependency of a dependency of a dependency… you need to be able to determine if simply removing one of your development packages will clear up the vulnerability.In the example below, we have a Ruby application and it is common to have SQLite bundled with Ruby to simplify development, but you probably wouldn't use that same SQLite database in production. Knowing this, and armed with the right details from the container vulnerability scan, you can make the decision to ignore vulnerabilities in the libraries that get installed with SQLite in development. We'll see how the Docker scan provides this information and additional details that make this task much simpler.
Trim down for test images
Test images: aren't much different in practice than development images, at least in terms of how to consider vulnerabilities. If you know a vulnerability is part of a test package that will not be in the production image you may elect to ignore it. This is a good point to do a comparison of scan results with the development stage, especially if you elected to ignore any severe vulnerabilities in the development stage. Are the vulnerabilities from the development images truly gone in test? If so, your process is working. If not, it might be time to go back and adjust your development image or build steps.Button down your production images
Production images: are the critical images as they'll actually be running somewhere, potentially exposed to the outside world. Still, getting to zero vulnerabilities, even when you slim down and remove as much as possible, may be a challenge. The goal, in many cases, is to automate the release process. You certainly want to address high-risk vulnerabilities, especially those with known exploits, but part of the reason you also want to scan the development and test stage images is to reduce the number of surprises you have when you are ready to release. If you've mitigated the risks early, then the main function of production scanning is just to find new, late-breaking vulnerabilities.
Let us take a look at another example to see how you can use Docker and Snyk to help with your middle layers.
Putting it into practice example: Prioritizing user-introduced vulnerability fixes
In this example, we will show some practical "middle layer" techniques you can use with the Docker vulnerability scanning capabilities powered by Snyk. First, we're using a slightly more interesting application this time. It's a Ruby app but that's not terribly important for these exercises.
Here’s our Dockerfile:
```
FROM ruby:2.5.1

RUN apt-get update && \
  apt-get install -y git vim && \
  rm -rf/var/lib/apt/lists/*

RUN gem update --system 3.0.4 && \
  gem install bundler -V '2.0.2'

WORKDIR /usr/src/app/alpha-blog

COPY . .

ENV BUNDLER VERSION 2.0.2

RUN bundle update && \
  bundle install && \
  rails db:setup && \
  rails db:migrate

EXPOSE 3000

CMD ["rails", "server", "-b", "0.0.0.0"]
```
It's still a pretty simple Dockerfile where we add several layers on top of our Ruby parent image:
The first `RUN` line adds in a couple of utilities to do some local development inside the image
We follow that up by getting our core ruby components updated and ready to go
Our code is copied over via the `COPY . . ` command
Our Rails project gets bootstrapped with the `RUN bundle…` commands
If you're thinking "Installing git and vim in an image seems like a strange choice," you are correct. Don't do this. The full lab mentioned in the previous note goes into the history of this image and why these are here.
While it’s not terribly complex to see what’s happening, as you can imagine each of these Dockerfile lines ends up installing quite a bit, potentially adding new vulnerabilities to our image.
We can build this image and test it the same way we did before:
```
$> docker build -t blog .

[+] Building 111.5s (11/11) FINISHED
.
.
.
=> [6/6] RUN bundle update && bundle install &&
  rails db:setup && rails db:migrate 108.8s
=> exporting to image                                           1.6s
=> => exporting layers                                          1.6s
=> => writing image sha256:0b7c017032e301429...433c23a5         0.0s
=> => naming to docker.io/library/blog                          0.0s

$> docker scan blog -f Dockerfile

Testing blog...
.
.
.
X High severity vulnerability found in bzip2
  Description: Out-of-bounds Write
  Info: https://snyk.io/vuln/SNYK-DEBIAN9-BZIP2-450801
  Introduced through: bzip2@1.0.6-8.1, bzip2/libbz2-dev@1.0.6-8.l, imagemagick/libmagickcore-dev@8:6.9.7.4+dfsg-11+deb9u6,meta-common-packages@meta
  From: bzip2@1.0.6-8.1
  From: bzip2/libbz2-dev@1.0.6-8.1
  From: imagemagick/libmagickcore-dev@8:6.9.7.4+dfsg-ll+deb9u6>imagemagick/libmagickcore-6.q16-dev@8:6.9.7.4+dfsg-1l+deb9u6 › bzip2/libbz2-devel.0.6-8.1
  and 1 more..
  Introduced by your base image (ruby:2.5.1)

X High severity vulnerability found in apt/libapt-pkg5.0
  Description: Arbitrary Code Injection
  Info: https://snyk.io/vuln/SNYK-DEBIAN9-APT-407402
  Introduced through: apt/libapt-pkg5.0@1.4.8, apt@l.4.8
  From: apt/libapt-pkg5.001.4.8
  From: apt@l.4.8 > apt/libapt-pkg5.001.4.8
  From: apt@l.4.8
  Introduced by your base image (ruby:2.5.1)
  Fixed in: 1.4.9

Organization:      snyk-pmm
Package manager:   deb
Target file:       Dockerfile
Project name:      docker-image|blog
Docker image:      blog
Base image:        ruby:2.5.1
Licenses:          enabled

Tested 413 dependencies for known issues, found 871 issues.

Base Image     Vulnerabilities   Severity
ruby:2.5.1     867               48 high, 237 medium, 582 low

Recommendations for base image upgrade:

Minor upgrades
Base Image     Vulnerabilities   Severity
ruby:2.5       257               6 high, 34 medium, 217 low

Alternative image types
Base Image                       Vulnerabilities   Severity
ruby:2.5-slim                    53                0 high, 5 medium, 48 low
ruby:2.7.0-slim-buster           61                1 high, 8 medium, 52 low
ruby:2.7.0-preview3-slim-buster  63                1 high, 9 medium, 53 low
ruby:2.7.0-preview2-slim         63                1 high, 9 medium, 53 low
Clearly, whoever created this Dockerfile neglected to follow our advice in the previous section: 871 vulnerabilities and our parent image starts out with 867! We'll have to track that person down and give them a copy of this guide. But our immediate focus is to figure out if we added vulnerabilities in any of our own Dockerfile commands. The difference between the total issues and the base image issues indicates there are at least four vulnerabilities for us to address.
The `docker scan` command can help us narrow this down pretty quickly by ignoring all the vulnerabilities from the base image via the `–exclude-base` option. Here's another scan and a snippet of the output when we exclude the base image vulnerabilities:
The `—exclude-base` option requires the inclusion of the Dockerfile as part of the scan (the `-f Dockerfile` option we've been using)
X High severity vulnerability found in curl/libcurl3
  Description: Buffer Overflow
  Info: https://snyk.io/vuln/SNYK-DEBIAN9-CURL-466505
  Introduced through: curl@7.52.1-5+deb9u7, curl/libcurl4-openssl-dev@7.52.1-5+deb9u7, gitel:2.11.0-3+deb9u7
  From: curl@7.52.1-5+deb9u7 > curl/libcurl3@7.52.1-5+deb9u7
  From: curl/libcurl4-openssl-dev@7.52.1-5+deb9u7 › curl/libcurl3@7.52.1-5+deb9u7
  From: curl@7.52.1-5+deb9u7
  and 2 more..
  Introduced in your Dockerfile by `RUN apt-get update && apt-get install -y git vim && rm -rf/var/lib/apt/lists/*`
  Fixed in: 7.52.1-5+deb9u10

Organization:     snyk-pmm
Package manager:  deb
Target file:      Dockerfile
Project name:     docker-image|blog
Docker image:     blog
Base image:       ruby:2.5.1
Licenses:         enabled

Tested 413 dependencies for known issues, found 70 issues.
This is a bit more manageable: 70 issues vs. 871. If you scroll through the list of detected vulnerabilities, you'll also see a line that begins with "`Introduced in your Dockerfile by`. We also have the dependency path that allows us to trace a particular vulnerability back to its source, but having the actual Dockerfile command (rather than a cryptic interpretation of the command) gets us directly to the point of introduction.
Still, 70 vulnerabilities is a bit much to deal with all at once.
Quite often, what security and development teams want to focus on first is all the fixable, high-severity vulnerabilities.
We can get to that level of detail pretty easily as well by taking advantage of the JSON output option with a bit of filtering using the command-line JSON utility, `jq` (note that `jq` is perfectly content with linefeeds inside the command):
```
$> docker scan blog -f Dockerfile --exclude-base --json | \
    jq '[.vulnerabilities[]
      | select(.nearestFixedInVersion)
      | select(.severity == "high")
      | { packageName,
          dockerfileInstruction,
          title,
          severity,
          version,
          nearestFixedInVersion}]'

[
  {
    "packageName": "curl",
    "dockerfileInstruction": "apt-get install -y git vim",
    "title": "Out-of-bounds Write",
    "severity": "high",
    "version": "7.52.1-5+deb9u7",
    "nearestFixedInVersion": "7.52.1-5+deb9u13"
  },
...
  {
    "packageName": "perl",
    "dockerfileInstruction": "apt-get install -y git vim",
    "title": "Integer Overflow or Wraparound",
    "severity": "high",
    "version": "5.24.1-3+deb9u4",
    "nearestFixedInVersion": "5.24.1-3+deb9u7"
  },
  {
    "packageName": "perl",
    "dockerfileInstruction": "apt-get install -y git vim",
    "title": "Buffer Overflow",
    "severity": "high",
    "version": "5.24.1-3+deb9u4",
    "nearestFixedInVersion": "5.24.1-3+deb9u7"
  },
  {
    "packageName": "perl",
    "dockerfileInstruction": "apt-get install -y git vim",
    "title": "Out-of-bounds Write",
    "severity": "high",
    "version": "5.24.1-3+deb9u4",
    "nearestFixedInVersion": "5.24.1-3+deb9u7"
  }
]
```
There we go! In our final view, there are 36 vulnerabilities listed, all of which are high severity with a fix available along with our Dockerfile command and the fix version. From here we should be able to fix these vulnerabilities. If you’re not familiar with the jq command this may look complex so here’s a quick overview of what we’ve done, but jq is pretty powerful and worth taking a little time to learn:
To start, we added the `--json` output option to our `docker scan` command, then, using `jq`, we did the following:
Selected only the vulnerabilities from the output
Chose only the vulnerabilities that have a fix and similarly vulnerabilities with a "high" severity
Tidied up the output a bit by only showing a handful of the vulnerability fields
Developer-first container security
Snyk finds and automatically fixes vulnerabilities in container images and Kubernetes workloads.
Conclusions
Container security is a wide-ranging topic, and even narrowing the scope to just image security presents several security vectors to examine. But when it comes to securing your images here are the key points to reflect upon:
Start with base images from a provider you trust. Use digital signatures to verify authenticity.
When possible, opt for minimal base images that have only the basic operating system packages, your framework version of choice, and build up from there.
Check your images for vulnerabilities, early and often. Create your own approved base images that are actively maintained and pass all your security checks but scan again as new images get created.
Scan in multiple places in the software lifecycle: the desktop, in CI, stored images in registries, and the containers/pods actively running in your clusters.
When you are choosing tools to perform your scanning, look beyond the vulnerability list they provide:
Will the tool go beyond just reporting vulnerabilities and alert you to the fact that there may be a newer or better base image to use?
If a build fails due to vulnerability detections, will the tool provide developers and DevOps teams with enough information to fix the issues?
Does the tool provide the flexibility you need to set your security gates?
One size doesn't always fit all – your developers will likely need more tools in an image than you'd allow in production, so you might have different images at each stage of the development lifecycle. Automation, CI, and Dockerfiles that support these stages provide appropriate security gates and provide for the right balance of security and productivity, provide the most benefits.
To get started securing your container images with Docker and Snyk, sign up now!
Up Next
Docker Security Scanning Guide 2023
Learn more about Docker Security Scanning to help you get started scanning your container images in Docker and other registries.
Keep reading


